You need allocate pictures to timeline after load them to Image Queue. Pholody provides 3 ways to allocate pictures: use Make it! button, use template or allocate manually.
1. Use Make it! button
With this approach Pholody automatically allocates all pictures in a balanced but diversified manner. Moreover, if you are using modern browsers such as Google Chrome, Pholody will analyze music pace and try to align all transitions with drum beats (if they exist). To make such analysis, Pholody need play through the whole music. So you need wait till music play ends.
- To get best accuracy, during playing it is important to stay on the same tab, but not switch to other tabs (or windows). So the best practice is to click Make it! button, then go for a coffee break.
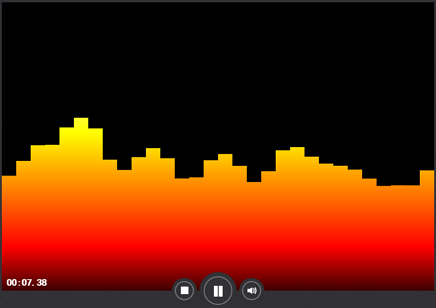
Upon clicking Make it! button, the music will start to play. Pholody makes analysis in background and shows music spectrum in Video Window. Below is a screenshot of spectrum graph.
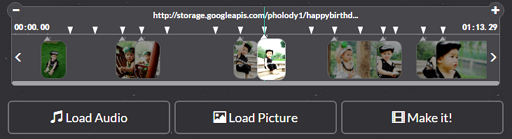
After music play ends, it will take a few seconds to calculate the allocation, then another few seconds to refresh pictures. After that, you will see all pictures move out of Image Queue and land in Timeline Panel. Try to play the slideshow and see the magic!
If you are using legacy browsers, the pace parser function may not be available. In that case Pholody will skip music analysis, and try to allocate all pictures evenly on timeline. The result won't be that cool, but still satisfiable in most cases.
If not satisfied with auto allocation result, you can try a template instead.
2. Use a template
A template is a piece of music plus a group of pre-defined animation effects. The effects are designed by the folks who have deepest understanding on Pholody, so they are perfectly synchronized with music.
To use templates you need load pictures first, then click Template button at Project Manage area. A dialog box will show up as below.
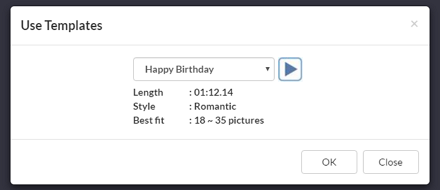
You can select template from the drop-down list, and preview the music by clicking the button. The text below drop-down list shows music length, music style, and the number of pictures that fit it best. There exists Best fit because, if too few pictures, you may see long still picture at end of slideshow. On the other hand, if too many pictures, some of them may be left unallocated.
If you feel good about some template, select it and click OK button. Pholody will fit all pictures into pre-defined animation effects. Again, you may need wait a few seconds for the pictures to refresh themselves.
3. Allocate manually
To precisely control the behavior of each picture, you can manually manage allocation by adding, removing or replacing pictures on timeline.
- Add picture
You can simply add a picture by dragging it from Image Queue to Timeline window, or double clicking a picture in Image Queue after setting current time.
By default, a newly allocated picture will have Merge animation. You can double click the picture again to set more animation options.
- Remove picture
Select an allocated picture by single-clicking it on timeline, aicon will show up at top-right corner of Video Window. Click the icon, the picture will be removed from timeline and return to Image Queue.
- Replace picture
Select an allocated picture on timeline, then double click another picture in Image Queue. The allocated picture will be swapped with the one in Image Queue. The new picture inherits all settings of the replaced one. Therefore, if the aspect ratio of new picture differs from replaced one, it may be incorrectly scaled. In that case you can click theicon in Video Window to reset the scaling.
- Move allocated picture on Timeline
Just drag it along Timeline.
Note that regardless of which approach you used to allocate pictures, you may need manually reposition some of them to make a perfect photo slideshow.
For any question or advice, please feel free to leave a message here.